A small knitted rainbow can become a special detail for all kinds of projects. I originally designed this rainbow as a decorative element for a baby sweater, but there are many other ways to use it: decorate children’s clothes, cover a small hole, personalise a blanket, or make several rainbows for a hanging baby mobile.
In this tutorial, I’ll show you how to knit the rainbow step by step, using German short rows to create the central semicircle and then adding the different coloured arches.
Materials
- Small amounts of yarn in 5 colours.
- Needles suitable for your yarn.
- A tapestry needle to weave in the ends and sew the rainbow onto your project.
Abbreviations
- St (s): stitch(es)
- K: Knit
- P: Purl
- RS: Right side
- WS: Wrong side
- K2tog: Knit 2 sts together
- YO: Yarn over
- Sl: Slip stitch knitwise with yarn in back
- kfb: Knit into front and back of stitch (1 st increased). Video Knit in Front and Back (kfb) | Purl Soho
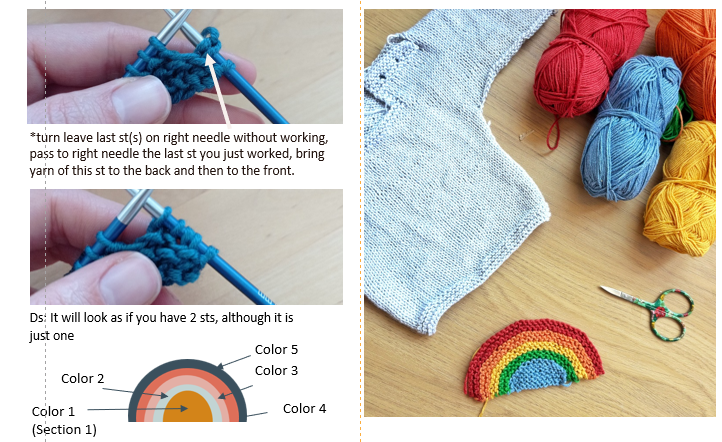
- Ds: Double stitch (for German short-row technique). Video – German Short Rows Tutorial | Purl Soho
- Garter st: Garter stitch. Working flat – (RS): Knit, (WS): knit
How to Knit the Rainbow
1. Center semicircle- German short rows
Cast on 12 sts using Color 1 for the central semicircle, using needles in the size recommended for the yarn.
Row 1 (RS): Sl1, k to the end.
Row 2 (WS): Sl1, k to the end.
Row 3-4: Repeat Rows 1-2 once more.
Row 5 (RS): Sl1, k to last st,* turn and create Ds.
Row 6 (WS): K to last st, turn and create Ds.
Row 7-8: K to last 2 st before end, turn and create Ds. (Watch out, What it seems to be 2 sts of the short row is only 1 sts).
Row 9-10: K to last 3 st before end, turn and create Ds.
Row 11 (RS): K7 (work every Ds as 1 st), k1, pick up and knit 2 sts of the lateral first 4 rows. 2 increases, 14 sts.
Row 12 (WS): Sl1, K12 (work every Ds as 1 st), k1, pick up and knit 2 sts of the lateral first 4 rows. 2 increases, 16 sts.
2. Rainbow Bands
This section is worked after completing the central semicircle (Section 1). Change to the color for the first rainbow band (Color 2).
Row 1 (RS): K2, (k3, kfb) x3, k2. 3 increases, 19 sts.
Even Row (WS) : Sl1, k to the end. All even rows are worked in this way.
Row 3 (RS): Sl1, k3, kfb, (k4, kfb) x2, k4. 3 increases, 22 sts.
Change to color 3
Row 5 (RS): K2, (kfb, k5) x3, k2. 3 increases, 25 sts.
Row 7 (RS): Sl1, k4, kfb, (k6, kfb) x2, k5. 3 increases, 28 sts.
Change to color 4
Row 9 (RS): K2, (k7, kfb) x3, k2. 3 increases, 31 sts.
Row 11 (RS): Sl1, k5, kfb, (k8, kfb) x2, k6. 3 increases, 34 sts.
Change to color 5
Row 13 (RS): K2, (kfb, D9) x3, k2. 3 increases, 37 sts.
Row 15 (RS): Sl1, k6, kfb, (k10, kfb) x2, k7. 3 increases, 40 sts.
Row 16 (WS): Bind off sts.
Weave in all loose ends and block the rainbow.
¿What can you do with a knitted rainbow?
Once you know how to knit it, this little motif can be used in many different ways:
- As an appliqué to decorate a sweater, cardigan or hat.
- To personalise baby or children’s clothes.
- To cover a small hole or repair an area of a knitted garment.
- To decorate blankets, bags or other knitted projects.
- Knit several rainbows to create a hanging baby mobile.
- As a small handmade detail to add to a gift.
Sometimes, a very simple motif can open up many possibilities. This rainbow started as part of a baby sweater, but there’s no reason to stop there.
Will you knit your own rainbow?